Server Administration Manual
Table of contents
- Do I need to run a Server?
- Requirements
- Installation
- Server Modes
- Configuration options
- Recording
- Adding metadata to the Server
- Servers on the desktop
- Backing up the Server
- Troubleshooting
Do I need to run a Server?
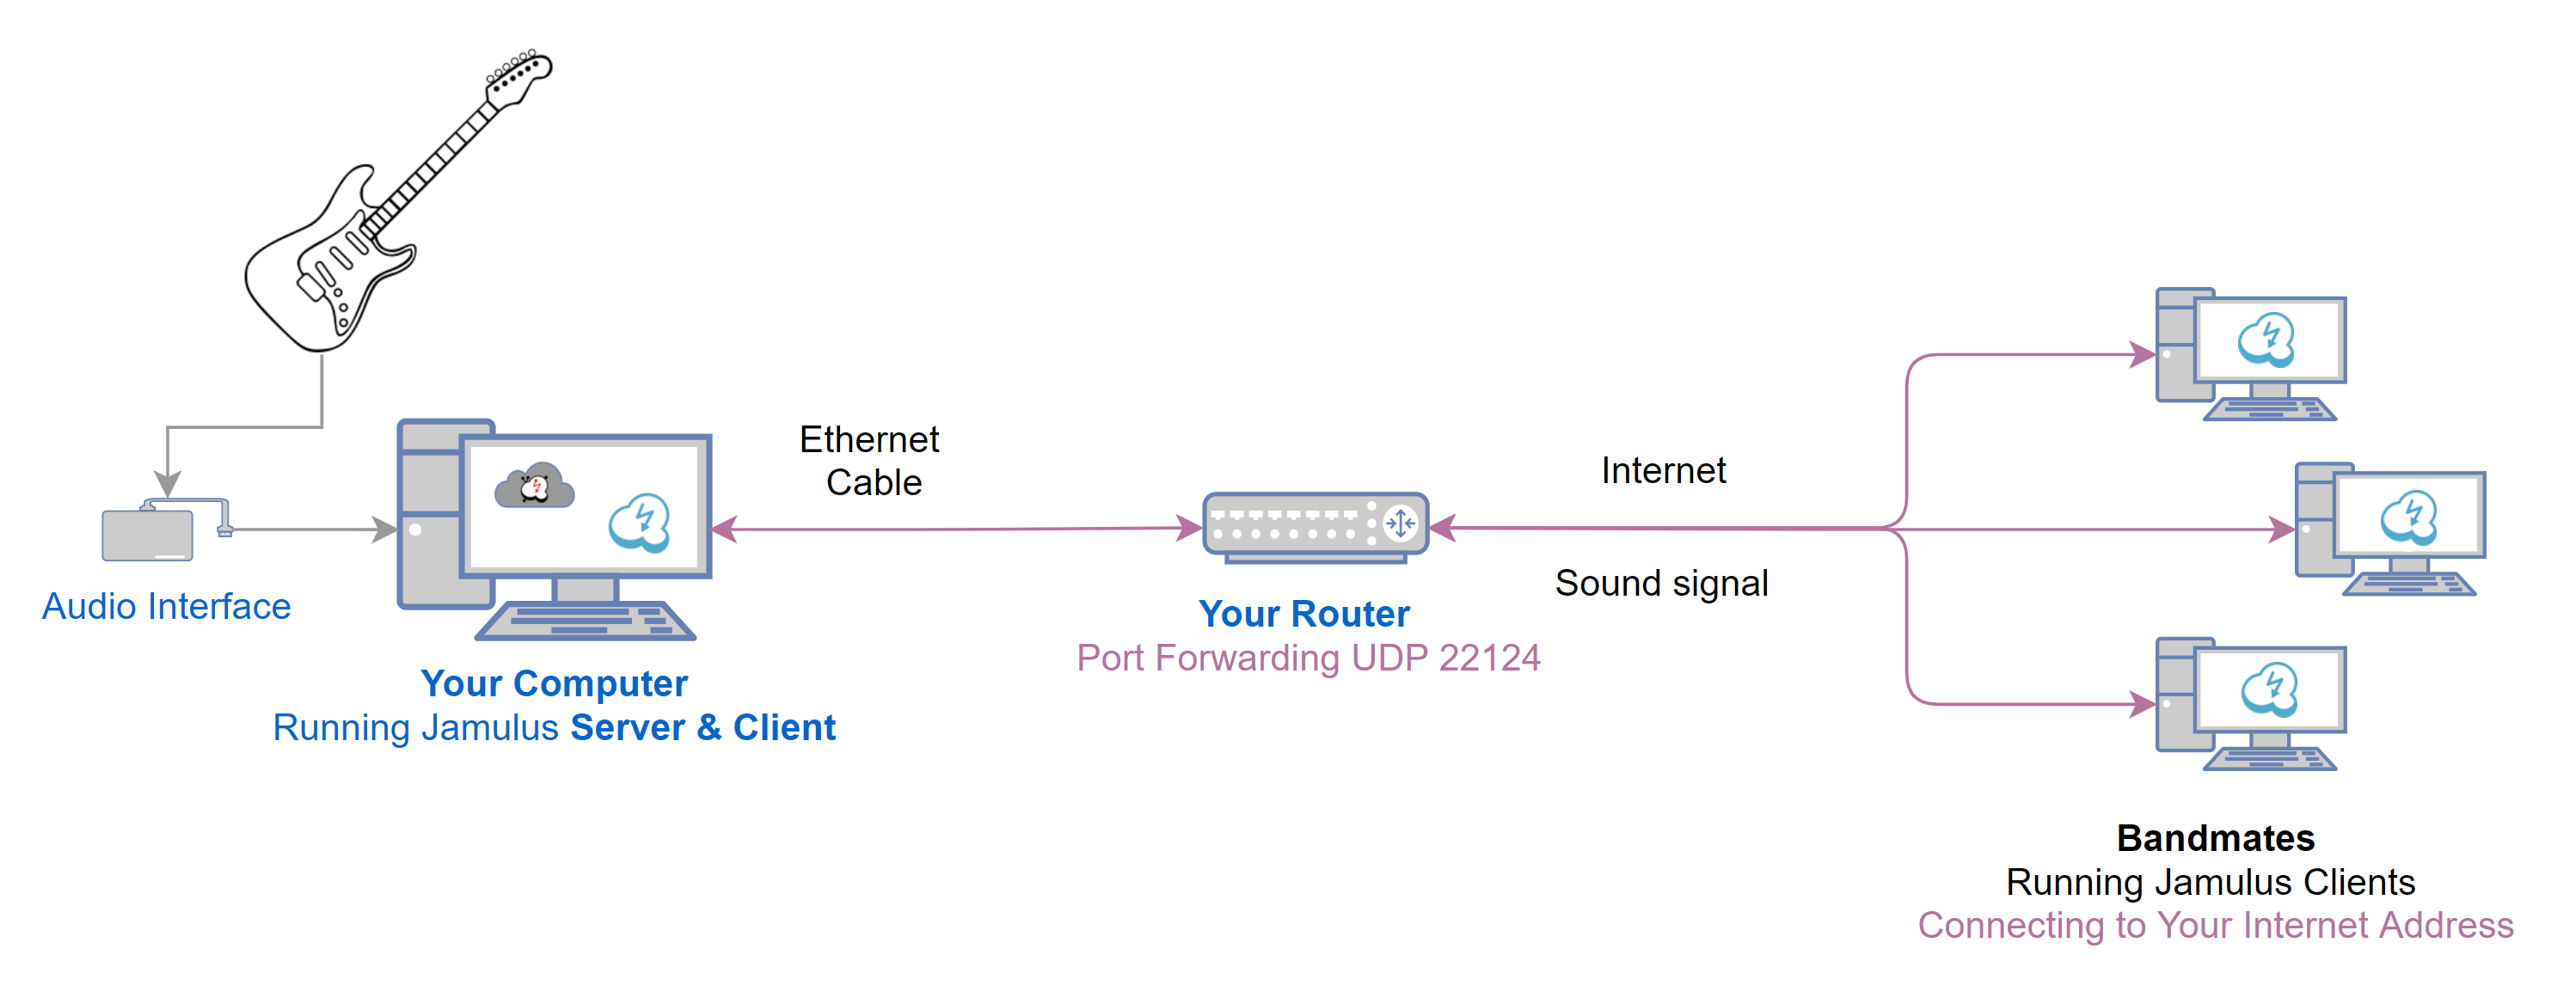
No. You don’t need to run a Server. You can use the Servers listed by the built-in Directories and use Jamulus without running a Server yourself. You can also use an unlisted Server if you know its internet address. Or you can use a third party hosting service such as melomax. There’s probably a Server nearby that you and your friends can use at low enough latency for most needs.
Using a public Server might introduce you to strangers. If you want an undisturbed session, you can use the soloing technique described on the Tips and Tricks page. You won’t hear strangers who connect to the Server, but they can hear you if they wish.
Requirements
Speed and latency
The capability of the Server itself (and the network it’s on) is NOT the main determinant of the quality of a Jamulus session!
Usually, problems are on the Client side and should be fixed there. Have a look at the Troubleshooting page if needed.
However, various problems can also arise when setting up Servers - especially when run on a low-bandwidth home connection. It’s usually fine to have less than 5 players on a slower-speed home connection (eg 10 Mbit/s down and 1 Mbit/s up). You can read more about network requirements at different quality settings here.
Consider using a cloud host, not your home internet connection, to get better ping times if you’re having problems.
General notes
- Any Server should have at least 1.6GHz CPU frequency and 1GB RAM
- Running a Server may require you to adjust any firewalls running on or outside of your machine or cloud host.
- You must set up port forwarding on your router to run an Unregistered Server at home. This should not be necessary when running a Registered Server in most cases. However, some home networks can require port forwarding for a Registered Server.
- Jamulus offers limited IPv6 support that you can turn on for a Client or Server from the command line.
Installation
Most people run Jamulus on a 3rd party/cloud host as a “headless” Server (no video display or keyboard) on hardware without audio running Linux. You can also run a Server in a desktop environment.
Note The following steps will result in you running an “Unregistered” Server. For more information, see the Server Modes section below.
To run a headless server on Linux, the following steps assume you are familiar with the command line and Debian/Ubuntu or similar distribution that uses systemd.
Download the setup script:
curl https://raw.githubusercontent.com/jamulussoftware/jamulus/main/linux/setup_repo.sh > setup_repo.shMake the script executable:
chmod +x setup_repo.shRun the script and install the headless server:
sudo ./setup_repo.sh && sudo apt install jamulus-headlessEnable the headless Server process:
sudo systemctl enable jamulus-headlessAdd your desired command line options to the
ExecStartline in the systemd service file:sudo systemctl edit --full jamulus-headlessReload the systemd files and restart the headless Server:
sudo systemctl daemon-reload && sudo systemctl restart jamulus-headless
To edit your Server configuration, just repeat the last two steps above.
Server Modes
Servers can be run in one of three modes (either at home or on a 3rd party host), depending on your needs.
Unregistered mode
This is the default when starting a Server for the first time. Unregistered Servers are not listed by Directories, so only musicians who know your Server’s address can connect to it.
For information about running an Unregistered Server see this guide.
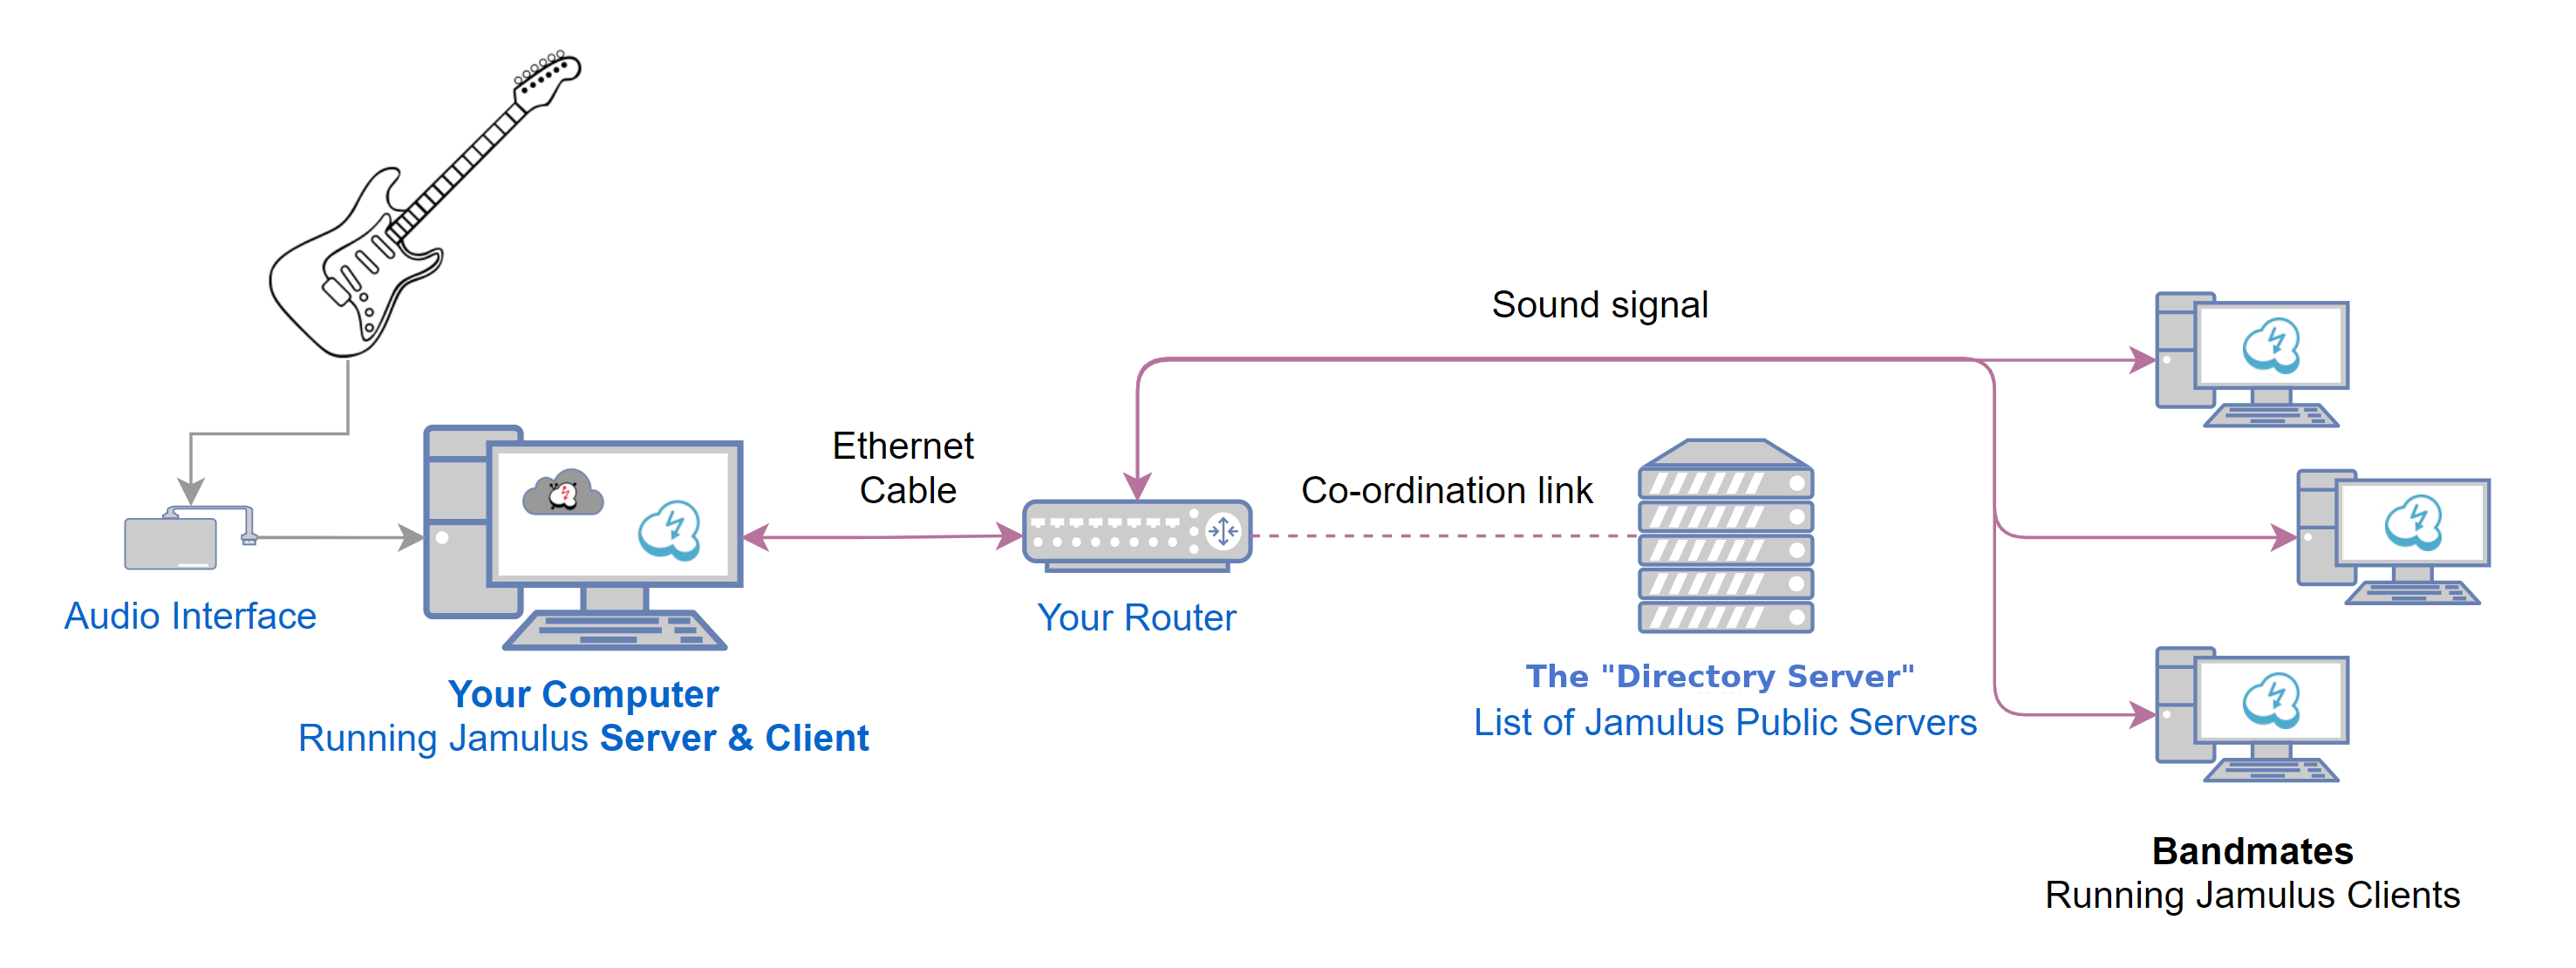
Registered mode
In this mode your Server will appear in the server list supplied by a Directory. Jamulus Clients come with a list of Directories built-in. If you register your Server with one of these, anyone can discover and connect to it.
Alternatively, you can list your Server on a Custom Directory (see below). Clients will only find your Server if they enter the Custom Directory’s internet address.
Note that Directories can only register up to 150 Servers. If you see a message that says you cannot register your Server because the Directory is full, you can try registering with a different Directory.
Directory mode
If you want to run a number of Servers, possibly also behind a firewall or on a LAN, you may want to run your Server as a Directory. Examples include online events, music associations, sectional rehearsals or music lessons for schools.
For information, see the Directories guide.
Configuration options
Depending on your operating system and how you are running the Server, you can set Server options and make them persistent between reloads by following these steps:
For Linux headless (Debian/Ubuntu using systemd)
Add your desired command line options to the ExecStart line in the systemd service file by running sudo systemctl edit --full jamulus-headless (You will need to reload or restart for the changes to take effect. See Installation).
For the GUI (all platforms)
Any settings made using the graphical interface will be stored in the Jamulusserver.ini file. (Do not edit this file by hand!) However, some options are not available in the GUI and need to be set using the command line. For more information, see Servers on the desktop.
Minimum setup to run in Registered mode
You can run a headless Server on Linux using systemd (with systemctl), which is covered in other sections. You can also run a Server directly from the command line. Enter the following command to run a Registered Server:
jamulus-headless --nogui --server \
        --directoryaddress hostname:port \
        --serverinfo "[name];[city];[country as two-letter ISO country code or Qt5 Locale]"
See the table below for hostname:port values.
Note: Semicolon and newline characters are not allowed in [name] and [city] within the --serverinfo argument. See the Server mode-related options for more information on the country code.
Server mode-related options
-e or --directoryaddress
Required for a Registered Server. Also required to run Jamulus as a Directory.
This option takes the format:
--directoryaddress hostname:port where hostname is the Genre Directory host name and port is its port number.
To register with one of the Directories built into the Jamulus Client, replace hostname:port with one of the following options:
| Genre | hostname:port |
|---|---|
| Any Genre 1 | anygenre1.jamulus.io:22124 |
| Any Genre 2 | anygenre2.jamulus.io:22224 |
| Any Genre 3 | anygenre3.jamulus.io:22624 |
| Genre Rock | rock.jamulus.io:22424 |
| Genre Jazz | jazz.jamulus.io:22324 |
| Genre Classical/Folk | classical.jamulus.io:22524 |
| Genre Choral/Barbershop | choral.jamulus.io:22724 |
Recent versions of Jamulus support DNS SRV records (“service” records) for automatically finding the port number to use to connect to a Directory or Server. This allows just the hostname to be specified, without the port number. See this page for details and applicable version numbers.
-o or --serverinfo
When registering your Server with a Directory, this lets you supply a Server name and location details so that users can then search for these values from their Client.
This option takes the format:
[name];[city];[country as two-letter ISO country code]
See two-letter ISO country codes
Note: Semicolon and newline characters are not allowed in name and city values.
-L or --licence
Show an agreement window before users can connect. The text of the agreement to be shown should be supplied as the --welcomemessage (see below).
-w or --welcomemessage
A “welcome message” to display in the Client chat window on connect. Can be given as a string or filename, and can contain HTML. When a path is used, the file must be accessible by the user account running Jamulus. (On most Linux installations, user jamulus is used by default.) If not accessible, the literal path (rather than its contents) will appear.
--serverpublicip
The public IP address of the Server if connecting to a Directory behind the same NAT. See the Directories guide for further information.
--directoryfile
Directories only: Remember registered Servers even if the Directory is restarted. See the Directories guide for further information.
-f or --listfilter
Directories only: Specify which Servers can register on the Directory Server. See the Directories guide for further information.
General Server options
These options can be used regardless of which mode your Server is running in (although some may not be relevant for Directories).
-d or --discononquit
Normally, when a Server is stopped or restarted, any Clients that have not pressed their Disconnect buttons will automatically re-establish the connection when the Server returns. This option forces Clients to manually re-establish their connections to the Server in this scenario.
-F or --fastupdate
Reduces latency if Clients connect with the Small Network Buffers option. Requires faster CPU to avoid dropouts, and more bandwidth to enabled Clients.
-l or --log
Enable logging, set path and file name
-P or --delaypan
Start with delay panning enabled. This option uses small differences in sound arrival time between the two ears. It produces a stereo effect similar to natural human hearing when compared to normal “volume” panning.
-s or --server
Start Jamulus in Server mode
--serverbindip
Specify the IP address the Jamulus process will bind to.
Normally, Jamulus will listen on all IP addresses on the host machine. Where the host has multiple network addresses, this option allows one of the addresses to be chosen.
-T or --multithreading
Use multithreading to make better use of multi-core CPUs. This setting may help the Server support more Clients. See also --numchannels
-u or --numchannels
Maximum number of channels (Clients)
-z or --startminimized
Start the Jamulus Server graphical user interface in the minimized window state.
Other options
-hor--helpDisplay help text-ior--inifileSet location of initialization file (overrides default. On macOS simply provide a filename only, since config files can only be read from/Users/<username>/Library/Containers/app.jamulussoftware.Jamulus/Data/. For the server replaceapp.jamulussoftware.Jamuluswithapp.jamulussoftware.JamulusServer. Turn on “Show Library folder” in “Show view options” in Finder to see this folder.)-nor--noguiDisable GUI (for use in headless mode)-por--portSets the local UDP port number. Default is 22124--jsonrpcportEnables JSON-RPC API server to control the app, set TCP port number (EXPERIMENTAL, APIs might change; only accessible from localhost). Please see the JSON-RPC API Documentation file.--jsonrpcsecretfileRequired when using--jsonrpcport. Sets a path to a text file containing an authentication string for getting access to the JSON-RPC API.--jsonrpcbindipThe IP address the JSON-RPC server should bind to. (optional, defaults to 127.0.0.1)-Qor--qosSets the quality of service DS Field byte. Default is 128 (DSCP/CS4). QoS is ignored by Windows. To enable it, see this page-tor--notranslationDisable UI language translations-6or--enableipv6Enable IPv6 addressing (IPv4 is always enabled)-vor--versionOutput version information and exit
Controlling the Server via API
Jamulus can be controlled via an experimental API which is subject to changes. You can find the JSON-RPC API documented in the main repository. JSON-RPC allows you to control some features like changing the welcome message or starting recordings in headless mode from authenticated external applications. It works while the server is running.
Recording
-R or --recording
Set Server recording directory. By default, the Server will record when a session is active.
Note: You will need to save recordings to a path outside of the jamulus home directory, or remove ProtectHome=true from your systemd unit file, but be aware that doing could be a security risk.
Recordings are per track in Audacity.lof format and REAPER.rpp. Open the respective files to listen to them in those applications.
Note: When your Server is recording, Clients display a red banner message that the session is being recorded.
--norecord
Set server not to record by default when recording is configured.
Controlling Recording
Recording starts once the first person connects to the Server, and stops when the last person leaves.
If the Server receives a SIGUSR1 signal during a recording, it will start a new recording in a new directory. SIGUSR2 will toggle recording on/off. If JSON-RPC is enabled, you will also be able to manage the server in a way comparable to the GUI. Please see the (experimental) JSON-RPC documentation on the recorder.
To send these signals using systemd, create the following two .service files in /etc/systemd/system, calling them something appropriate (e.g. jamulusTogglerec.service).
To turn recording on or off (depending on the current state):
 [Unit]
 Description=Toggle recording state of Jamulus Server
 Requisite=Jamulus-Server

 [Service]
 Type=oneshot
 ExecStart=/bin/systemctl kill -s SIGUSR2 jamulus-headless
To start a new recording:
 [Unit]
 Description=Start a new recording on Jamulus Server
 Requisite=Jamulus-Server

 [Service]
 Type=oneshot
 ExecStart=/bin/systemctl kill -s SIGUSR1 jamulus-headless
_Note: The Jamulus service name in the ExecStart line needs to be the same as the .service file name used by systemd to control your Jamulus Server. By default, if you use the .deb files from the repository, it is jamulus-headless, as in this example.
Run sudo systemctl daemon-reload to register them for first use.
Now you can run these with the systemctl command, for example:
sudo systemctl start jamulusTogglerec
You can see the result of these commands if you run systemctl status jamulus-headless (or the respective service name you specified manually). You can also view your (sys)log.
Adding metadata to the Server
You can add metadata to the welcome message of a Server to add additional, hidden information like contact information or policy requests for bots (this is comparable to robots.txt). See the Community Knowledge Base entry about metadata for more information.
Servers on the desktop
Jamulus can run in Server mode in the graphical environment of a computer. This gives you a graphical user interface to control most of the settings. To do this, first install Jamulus for your platform, then do one of the following:
Windows users - Use the “Jamulus Server” icon in the Windows Start menu. If you want the Server to start automatically when you start Windows, check the box for this option.
macOS users - Double-click the “Jamulus Server” icon in Applications.
Linux users - Launch the “Jamulus Server” shortcut. Or you can open a terminal window (
CTRL+ALT+ton Debian and related distros), typejamulus -sand hit return.
While most common functions in Jamulus can be set using the GUI, others can only be set using options given in a terminal window when the Server is launched. Exactly how you do this will depend on your operating system.
For example on Windows, to use a specific settings file, right-click on the Jamulus shortcut and choose Properties > Target. Add the necessary arguments to Jamulus.exe:
"C:\Program Files\Jamulus\Jamulus.exe" --serverbindip 192.168.0.100
For macOS, start a Terminal window and run Jamulus with the desired options like this:
/Applications/Jamulus.app/Contents/MacOS/Jamulus --serverbindip 192.168.0.100
Note Command line options will set the Server’s defaults at startup. You can override them while the Server is running using their corresponding GUI controls.
The Server status icon
When a Server is running in GUI mode, the operating system will show an icon in the system tray or status area that indicates whether the Server has connections:

The Server is empty

The Server is occupied
Backing up the Server
Once installed and running, you may want to keep a copy of your settings. Having a backup is always a good idea, and settings files are not backwardly compatible between versions of Jamulus. So if you want to go back to the previous version, you will need to restore the settings you had.
To find your settings file on Windows, type %APPDATA% into the search bar and look for a folder named Jamulus. There will be one or more .ini files in this folder. Now back up Jamulus’ settings.
For all other platforms, run the following from the command line to find where they live and copy the files to another location:
find ~ -name Jamulus.ini -ls
If you used the --inifile parameter to save an inifile to a different location, don’t forget to also backup these files. Points to note
- Do not back up or restore settings files when Jamulus is running.
- It is not recommended to manually edit settings files (they’re not designed for that).
You can revert all settings to their defaults by just deleting the settings file (after closing Jamulus).
- Headless Servers do not use
.inifiles. All configuration is given as command line options. If you are running a Server in GUI mode, after reading any command line options on start, it will store its configuration in theJamulusserver.inifile.
Troubleshooting
If you are having other problems, see this guide.