User Manual
This manual documents the Jamulus Client application for use by musicians and singers using the software to connect to a server.
Table of contents
Main Window
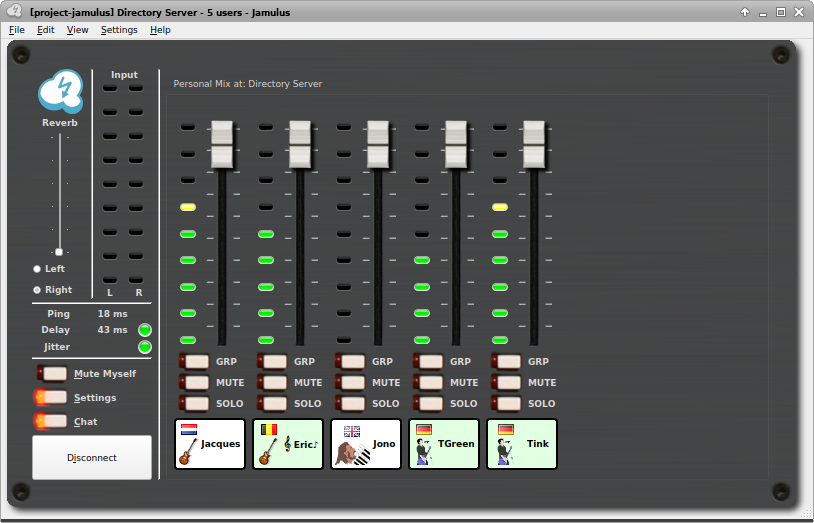
Ping, Delay and Jitter
Ping shows your network latency in milliseconds, the lower the better. Ping time contributes to overall delay (see below). The most probable cause of a high ping is that your distance to the server is too large.
Delay shows overall latency calculated from the current ping time and the delay introduced by the current audio buffer settings. The LEDs show the status of this as:

Green - The delay is perfect for a jam session

Yellow - A session is still possible but it may be harder to play

Red - The delay is too large for jamming
Jitter shows the current audio/streaming status. If the light is red, the audio stream is interrupted. This is caused by one of the following problems:
- The network jitter buffer is not large enough for the current network/audio interface jitter.
- The sound card’s buffer delay (buffer size) is too small (see Settings window).
- The upload or download stream rate is too high for your internet bandwidth.
- The CPU of the Client or server is at 100%.
Input
Shows the level of the two stereo channels for your audio input. Make sure not to clip the input signal to avoid distortions of your sound (the LEDs will indicate clipping when it occurs).
Mute Myself button
Cuts your audio stream to the server so that you will be able to hear yourself and see your own input levels, but other musicians will not. Be aware that other musicians will not know if you have muted yourself.
Reverb effect
Adds reverb to your local mono audio channel, or to both channels in stereo mode. The mono channel selection and the reverberation level can be modified. For example, if a microphone signal is fed in to the right audio channel of the sound card and a reverb effect needs to be applied, set the channel selector to the right and move the fader upwards until the desired reverb level is reached.
Chat
Opens the chat window. Text entered is sent to all connected Clients. If a new chat message arrives and the Chat dialogue is not already open, it will open automatically for all Clients. See Settings to optionally turn on a sound alert when a new chat message arrives.
Connect/disconnect button
Opens a dialogue where you can select a server to connect to. If you are connected, pressing this button will end the session. You can also open the dialogue using “File>Connection Setup…”. This will leave you connected to any current session until you join another.
The Connection Setup window shows a list of available Servers together with their “distance” (in terms of ping time), the number of occupants and the maximum number supported, the Server’s given location and the Server’s Version. Permanent Servers (those that have been listed for longer than 24 hours) are shown in bold.
Click on the Server you want to join and press the Connect button to connect to it. Alternatively, double-click on the server name.
Server operators register their servers with Directories. These are either genre-specific or for any genre, or additional custom entries. Use the Directory dropdown to select a genre. You can filter the list by server name or location. To list only occupied Servers, enter a “#” character. If you choose “Show All Musicians” the current occupants will be shown.
If you know the hostname or IP address of a private Server, you can connect to it using the “Server Address” field. An optional port number can be added after the address using a colon as a separator, e.g, jamulus.example.com:22124. (Note that IPv6 addresses must be entirely enclosed in square brackets, for example [::1]:22124.) The field will also show a list of the most recently used server addresses. The button that follows the field allows the current entry to be removed from the list.
Server audio mixer

The audio mixer screen shows each user connected to the server (including yourself). The faders allow you to adjust the level of what you hear without affecting what others hear.
The VU meter shows the input level at the server - that is, the sound being sent.
If you have set your Audio Channel to Stereo or Stereo Out in your Settings, you will also see a pan control (shift-click to reset).
If you see a “mute” icon above a user, it means that person cannot hear you. Either they have muted you, soloed one or more users not including you, or have set your fader in their mix to zero.
Users usually appear left-to-right in the order that they connect. When joining a server that already has participants, the default order depends on the versions of Jamulus at the client and the server. With a client version before 3.12.0 or a server version older than 3.5.5, the existing participants will be shown before your own fader channel. With a client of 3.12.0 or later connected to a server of 3.5.5 or newer, your own fader will be shown first, with the other existing participants shown to the right. In either case, participants joining subsequently will by default appear to the right of all the existing participants.
You can override this order and sort instead by name, instrument, group, city or channel number using the View menu. See Menu Commands below.
If the server operator has enabled recording, you will see a message above the mixer showing that you are being recorded.
Grp button
You can group users together using the “group” toggle. Moving the fader of any member of the group will move the other faders in that group by the same amount. You can isolate a channel from the group temporarily with shift-click-drag. Up to 8 groups can be defined.
Mute button
Prevents users being heard in your local mix. Be aware that when you mute someone, they will see a “muted” icon above your fader to indicate that you cannot hear them. Note also that you will continue to see their VU meters moving if sound from the muted user is reaching the server. Your fader position for them is also unaffected.
Note that muting your own channel only means you will not hear your signal from the server (and is not advised as it can lead to you becoming out of time with other players). This is therefore not the same as using “Mute Myself”.
Solo button
Allows you to hear one or more users on their own. Those not soloed will be muted. Note also that those people who are not soloed will see a “muted” icon above your fader.
Menu commands
File > Connection Setup…
Opens the connection dialogue (see above).
File > Load/Save Mixer Channels Setup
You can save and restore the mix you have for your band. This stores your settings for each person’s fader volume, pan setting, mute and solo state. You can load this mix any time (even while you are playing). Loading can also be done by drag/drop to the mixer window.
File > Exit
Closes all the windows and exits the application.
Edit > Clear All Stored Solo/Mute Settings
Whenever you Solo or Mute a channel, Jamulus remembers these settings. Even if that person leaves and rejoins - or you join a server where they are playing - the settings will automatically be applied. Use this command to clear all these stored settings.
Edit > Set All Faders to New Client Level
Applies the configured “New Client Level” to all currently connected channels.
Edit > Auto-Adjust All Faders
Applies a one-off fader adjustment to each channel depending on its volume. Useful for large ensembles to get a reasonable overall mix, although individual adjustments might still be necessary. Best applied during a warm-up or a uniform part of the music piece.
View > (sort options)
Most items under the “View” menu allow you to adjust the order Jamulus chooses to display channels on the server:
Own Fader First
This option can be used in addition to the others to move your own channel to always be the leftmost, irrespective of the sort order of the other channels.- No user sorting
This does not take any user details into account when sorting. It sorts by the order channels join the current server as described further up, with new channels being added to the right-hand end. - Sort by Name
Sorts by the name someone has chosen in their profile. - Sort by Instrument / City
Sorts by the instrument or city someone has in their profile, along with their name. - Sort by Group
Where the fader group feature is in use, this sorts in ascending group number from left to right (and within that, by name), with any ungrouped channels off to the right. - Sort by Channel
Where Jamulus channel controls (fader, mute, solo, etc) are being controlled by MIDI (see MIDI control), this sorts by the channel number to help ensure a stable sort order that aligns with MIDI hardware controls. Note that in Jamulus clients before version 3.12.0, channel numbers are assigned directly by the server. Clients from 3.12.0 onwards manage their own channel number assignments and always assign channel 0 to the local user (provided the server version is at least 3.5.5).
View > Chat
Opens the Chat window.
Settings Menu
Allows direct access to each of the Settings tabs.
Help
Provides access to the Getting Started and User Manual (this page) on the website, along with copyright, licence and acknowledgement details. There is also a “What’s This?” option for getting more details on parts of the client display.
Settings
My Profile
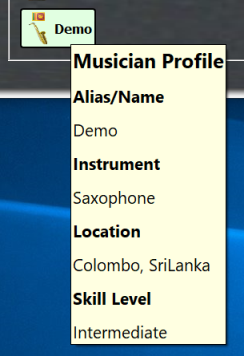
From the Settings menu, select “My Profile…” to set your Alias/Name which is displayed below your fader in the server audio mixer board.
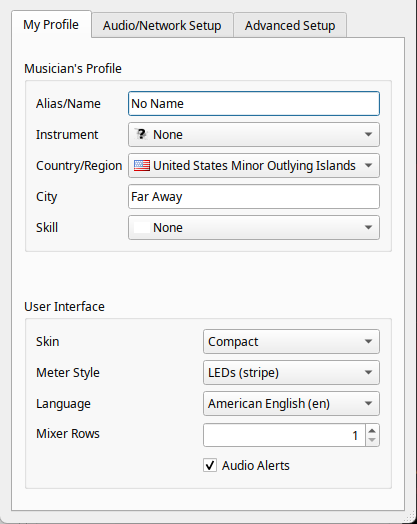
If you set an instrument and/or country, icons for these selections will also be shown below your fader. The skill setting changes the background colour of the fader tag and the city entry shows up in the tool tip of the fader tag:
Skin
This applies a skin to the main window, some of which are designed to accommodate larger ensembles.
Meter style
This changes the visual style of the audio meters, independently of the chosen skin.
Mixer rows
This sets the number of rows displayed in the server audio mixer, for use with larger ensembles.
Audio Alerts
This turns on a sound alert for when someone joins a Server, or when receiving a new chat message.
Audio/Network Setup
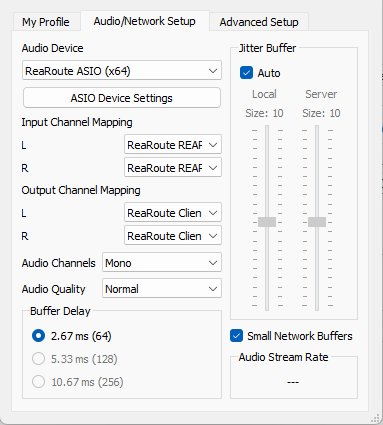
Audio Device
Under the Windows operating system the ASIO driver (sound card) can be selected using Jamulus. If the selected ASIO driver is not valid an error message is shown and the previous valid driver is selected. Under macOS the input and output hardware can be selected.
Input/output channel mapping
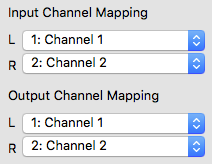
If the selected sound card device offers more than one input or output channel, the Input Channel Mapping and Output Channel Mapping settings are visible. For each Jamulus input/output channel (left and right channel) a different actual sound card channel can be selected.
Audio channels
Selects the number of audio channels to be used for communication between Client and Server.
Note: It is better to run separate Client instances per voice/instrument, where each Client has its own ini file, rather than using this built-in mono pair to stereo mixer.
There are three modes available:
Mono and Stereo modes use one and two audio channels respectively.
Mono-in/Stereo-out: The audio signal sent to the server is mono but the return signal is stereo. This is useful if the sound card has the instrument on one input channel and the microphone on the other. In that case the two input signals can be mixed to one mono channel but the server mix is heard in stereo.
Enabling stereo mode will increase your stream’s data rate. Make sure your upload rate does not exceed the available upload speed of your internet connection.
In stereo streaming mode, no audio channel selection for the reverb effect will be available on the main window since the effect is applied to both channels in this case.
Audio quality
The higher the audio quality, the higher your audio stream’s data rate. Make sure your upload rate does not exceed the available upload speed of your internet connection.
Buffer Delay
The buffer delay setting is a fundamental setting of the Jamulus software. This setting has an influence on many connection properties. Three buffer sizes are supported:
- 64 samples Provides the lowest latency but does not work with all sound cards.
- 128 samples The preferred setting. Should work for most available sound cards.
- 256 samples Should only be used on very slow computers, or with a slow internet connection.
Some sound card drivers do not allow the buffer delay to be changed from within the Jamulus software. In this case the buffer delay setting is disabled and has to be changed using the sound card driver. On Windows, press the ASIO Setup button to open the driver settings panel.
On Linux:
- when using JACK, use
QJackCtlto change the buffer size and restart JACK; - when using PipeWire’s JACK server, change PipeWire’s Quantum parameter with its own configuration tools.
The actual buffer delay has an influence on the connection status, the current upload rate and the overall delay. The lower the buffer size, the higher the probability of a red light in the status indicator (dropouts) and the higher the upload rate and the lower the overall delay.
The buffer setting is therefore a trade-off between audio quality and overall delay.
Jitter Buffer
The jitter buffer compensates for network and sound card timing jitters. The size of the buffer influences the quality of the audio stream (how many dropouts occur) and the overall delay (the longer the buffer, the higher the delay).
You can set the jitter buffer size manually for your local Client and the remote server. For the local jitter buffer, dropouts in the audio stream are indicated by the light below the jitter buffer size faders. If the light turns to red, a buffer overrun/underrun has taken place and the audio stream is interrupted.
The jitter buffer setting is therefore a trade-off between audio quality and overall delay.
If the Auto setting is enabled, the jitter buffers of your local Client and the remote server are set automatically based on measurements of the network and sound card timing jitter. If the Auto check is enabled, the jitter buffer size faders are disabled (they cannot be moved with the mouse).
Small Network Buffers
Allows support for very small network audio packets. These are only used if the sound card buffer delay is smaller than 128 samples. The smaller the network buffers, the lower the audio latency. But at the same time the network load increases and the probability of audio dropouts also increases (particuarly if your network connection has any significant jitter). Try enabling this option if you are suffering from high latency or bad audio quality. However, keeping it disabled will normally mean better audio quality.
Audio Stream Rate
Depends on the current audio packet size and compression setting. Make sure that the upstream rate is not higher than your available internet upload speed (check this with a service such as librespeed.org).
Advanced Setup
Custom Directories
If you need to add Directory addresses other than the built-in ones, you can do so here. Enter the hostname or IP address of the custom Directory. An optional port number can be added after the address using a colon as a separator, e.g, jamulus.example.com:22124. (Note that IPv6 is not currently supported for Directories.) The button that follows the field allows the current entry to be removed from the list.
New Client Level
This setting defines the fader level of a newly connected Client in percent. If a new user connects to the current server, they will get the specified initial fader level if no other fader level from a previous connection of that user was already stored. You can set all users in an occupied server to this level using Edit > “Set All Faders to New Client Level”.
Input Boost
Increases the gain from your device. Use this if your device delivers a gain that is too quiet for Jamulus.
Feedback Protection
Attempts to detect audio feedback loops or loud noise in the first three seconds after you connected to a server. Once detected, this feature will show a message and activate the “Mute Myself” button to mute you in your own mix.
Input Balance
Controls the relative levels of the left and right local audio channels. For a mono signal it acts as a pan between the two channels. For example, if a microphone is connected to the right input channel and an instrument is connected to the left input channel which is much louder than the microphone, move the audio fader to increase the relative volume of the mic.
MIDI Control
The volume fader, pan control and mute and solo buttons in the Client’s mixer window strips can be controlled using a connected MIDI controller. This feature is available from version 3.7.0 on macOS, Linux, and the JACK version of Jamulus for Windows. From Jamulus 3.12.0 onwards, it is also available for the non-JACK (ASIO) Windows version. To enable this feature and open a MIDI-in port, activate the “MIDI-in” checkbox.
MIDI Device
With MIDI-in enabled, Jamulus will detect the MIDI devices available for connection and list them in the ‘MIDI Device’ dropdown menu. Select the device you wish to connect to Jamulus. The non-JACK Windows version of Jamulus will automatically connect to all available MIDI devices if none have been selected previously or a saved device is not present. To connect to a single device, select it from the dropdown.
MIDI parameters
There is one global MIDI channel parameter (0-16) and two parameters you can set for each item controlled: First MIDI CC and consecutive CC numbers (count). First set the channel you want Jamulus to listen on (0 for all channels). Then, for each item you want to control (volume fader, pan, solo, mute), set the first MIDI CC (CC number to start from) and number of consecutive CC numbers (count) you wish to assign to that particular item. You can either type in the MIDI CC values or use the “Learn” button: click on “Learn”, actuate the fader/knob/button on your MIDI controller, and the MIDI CC number will be detected and saved.
As an example, a ‘First MIDI CC’ of 0 and a ‘Count’ of 8 for volume faders will mean that CC numbers 0 - 7 will control the volume faders for up to 8 mixer channels.
There is one exception that does not require establishing consecutive CC numbers which is the “Mute Myself” parameter - it only requires a single CC number as it is only applied to one’s own audio stream.
Pick-up Mode
When enabled, fader and pan controls will wait for your physical controller to match their value before moving. This prevents sudden jumps when they are out of sync.
Note: Jamulus does not provide feedback on the on/off state of buttons, meaning that your controller must keep track and toggle LEDs (if any) to ‘on’ or ‘off’ itself, that is, buttons on your MIDI controller need to be set to “toggle” mode. This means that when pressed to ‘turn on’ a control, it must send a MIDI CC number with a value >=64, and to ‘turn off’ the control it must send the same CC number with a value <64. You can read your controller’s manual to find out how to set this.
When MIDI is enabled, Jamulus will prepend a channel number to each Client name, which can be used to control the channel using MIDI CC numbers. In Jamulus version 3.12.0 onwards, when connected to a server of at least version 3.5.5, your own fader will always be given channel 0, and so will appear first when sorted by channel or when “Own Fader First” is enabled.
Tip: With default settings, when some users leave and others join, their left-right arrangement in the GUI may cease to follow a numerical order, making it more difficult to know who each physical fader/knob on your MIDI controller corresponds to. To keep the fader strips following a numerical order, go to “View” on the top menu bar and switch to “Sort by Channel” (or type Ctrl+E).
Backing up Jamulus
Once installed and running, you may want to keep a copy of your settings. Having a backup is always a good idea, and settings files are not backwardly compatible between versions of Jamulus. So if you want to go back to the previous version, you will need to restore the settings you had.
To find your settings file on Windows, type %APPDATA% into the search bar and look for a folder named Jamulus. There will be one or more .ini files in this folder. Now back up Jamulus’ settings.
For all other platforms, run the following from the command line to find where they live and copy the files to another location:
find ~ -name Jamulus.ini -ls
If you used the --inifile parameter to save an inifile to a different location, don’t forget to also backup these files. Points to note
- Do not back up or restore settings files when Jamulus is running.
- It is not recommended to manually edit settings files (they’re not designed for that).
You can revert all settings to their defaults by just deleting the settings file (after closing Jamulus).
- You can save and load different mixer settings using Load/Save Mixer Channels Setup and store those files wherever you want.
Note for macOS users: As of Jamulus 3.8.1, we have a signed installer. This will store the settings in
$HOME/Library/Containers/app.jamulussoftware.Jamulus/Data/.config/Jamulus/
Command Line Options
Most common functions in Jamulus can be set using the GUI, but these and others can also be set using options given in a terminal window. Exactly how you do this will depend on your operating system.
For example on Windows, to use a specific settings file, right-click on the Jamulus shortcut and choose “Properties” > Target. Add the necessary arguments to Jamulus.exe:
"C:\Program Files\Jamulus\Jamulus.exe" --inifile "C:\path\to\myinifile.ini"
For macOS, start a Terminal window and run Jamulus with the desired options like this:
/Applications/Jamulus.app/Contents/MacOS/Jamulus --inifile "/path/to/myinifile.ini"
-Mor--mutestreamPrevent others on a server from hearing what I play--mutemyownPrevent me from hearing what I play in the server mix (headless only)-cor--connectConnect to given server address on startup, formataddress[:port]-jor--nojackconnectDisable auto JACK connections--ctrlmidichMIDI channel to listen on, Jamulus control + MIDI control number and count of consecutive CC numbers (or Jamulus channels), pick-up mode, device selection option. Format:channel[;fn[*n]][;pn[*n]][;sn[*n]][;mn[*n]][;on][;u][;dDeviceName]See Tips & Tricks.--clientnameWindow title and JACK client name
-hor--helpDisplay help text-ior--inifileSet location of initialization file (overrides default. On macOS simply provide a filename only, since config files can only be read from/Users/<username>/Library/Containers/app.jamulussoftware.Jamulus/Data/. For the server replaceapp.jamulussoftware.Jamuluswithapp.jamulussoftware.JamulusServer. Turn on “Show Library folder” in “Show view options” in Finder to see this folder.)-nor--noguiDisable GUI (for use in headless mode)-por--portSets the local UDP port number. Default is 22124--jsonrpcportEnables JSON-RPC API server to control the app, set TCP port number (EXPERIMENTAL, APIs might change; only accessible from localhost). Please see the JSON-RPC API Documentation file.--jsonrpcsecretfileRequired when using--jsonrpcport. Sets a path to a text file containing an authentication string for getting access to the JSON-RPC API.--jsonrpcbindipThe IP address the JSON-RPC server should bind to. (optional, defaults to 127.0.0.1)-Qor--qosSets the quality of service DS Field byte. Default is 128 (DSCP/CS4). QoS is ignored by Windows. To enable it, see this page-tor--notranslationDisable UI language translations-6or--enableipv6Enable IPv6 addressing (IPv4 is always enabled)-vor--versionOutput version information and exit
Controlling the Client via API
In addition to the CLI, Jamulus can be controlled using an API. This is beneficial for advanced use cases - for example, where there is no GUI, or another application needs to interact with Jamulus. Please note that the API is still experimental. Information on the JSON-RPC API can be found in the main repository.